
Stera Sheen Sani-Tea - 1.5 Ounce Packets - Tea Brewer, Dispenser Cleaner and Sanitizer - Remove Tea Residues and Oils, Ensure
- Your order will contain a box of 80 x 1.5 oz. easy to use portion packets. Easy to follow instructions are.
- Cleans and sanitizes the following: tea brewers, tea and coffee dispensers, dispenser nozzles, brew.
- Sani-Tea Tea Brewer Cleaner by Purdy Products will not harm any components of your equipment and will.
- A Powerful descaler designed to clean & protect the following: urns, percolators, automatic drip, air.
A film of dried krausen or a sticky pellicle inside your fermentation vessel after a batch is finished poses a significant threat to future brews. These residues, if not removed thoroughly, can lead to off-flavors, infections, and wasted ingredients. Cleaning and sanitizing your fermentation vessels immediately after use, and storing them correctly, are fundamental practices for any home brewer or fermenter.
Neglecting proper vessel hygiene is a common pitfall for beginners and can cause frustration. A poorly cleaned carboy or bucket might look acceptable but still contain microscopic organisms ready to spoil your next creation. This guide covers the essential steps for cleaning, sanitizing, and storing your fermentation equipment to maintain a clean brewing environment.
Why Proper Cleaning and Sanitizing Matter
The difference between cleaning and sanitizing is important. Cleaning removes visible dirt, grime, and organic matter like yeast cakes, hops, and fruit pulp. This process physically scrubs away the bulk of potential contaminants. Sanitizing, on the other hand, reduces microorganisms (bacteria, wild yeast, molds) to a safe level, making the surface suitable for contact with your brew. You cannot effectively sanitize a dirty vessel. Both steps are necessary for successful fermentation.
Contamination can manifest in many ways. A sour beer, a moldy kombucha SCOBY, or a wine that tastes vinegary are all signs of unwanted microbial activity. These issues often originate from inadequately cleaned or sanitized equipment. Investment in good cleaning habits protects your ingredients and your time.
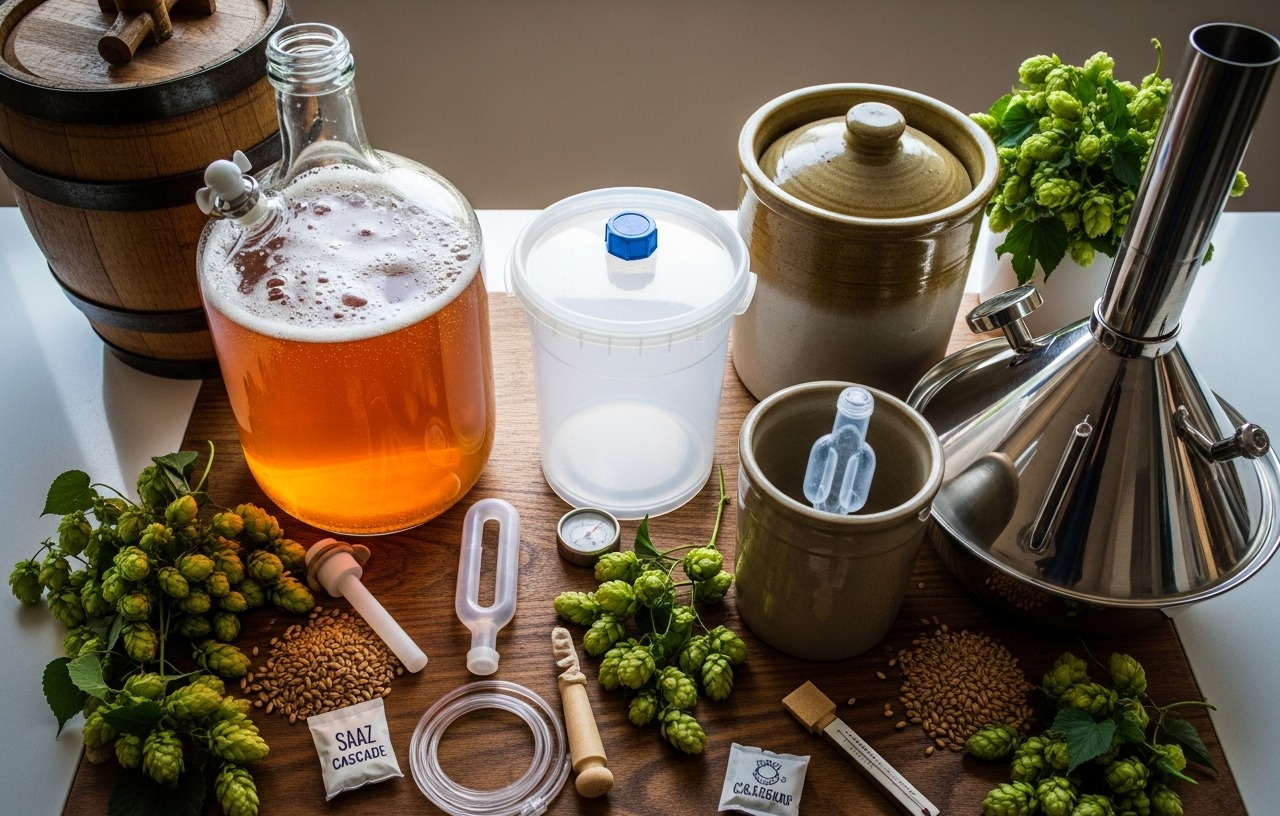
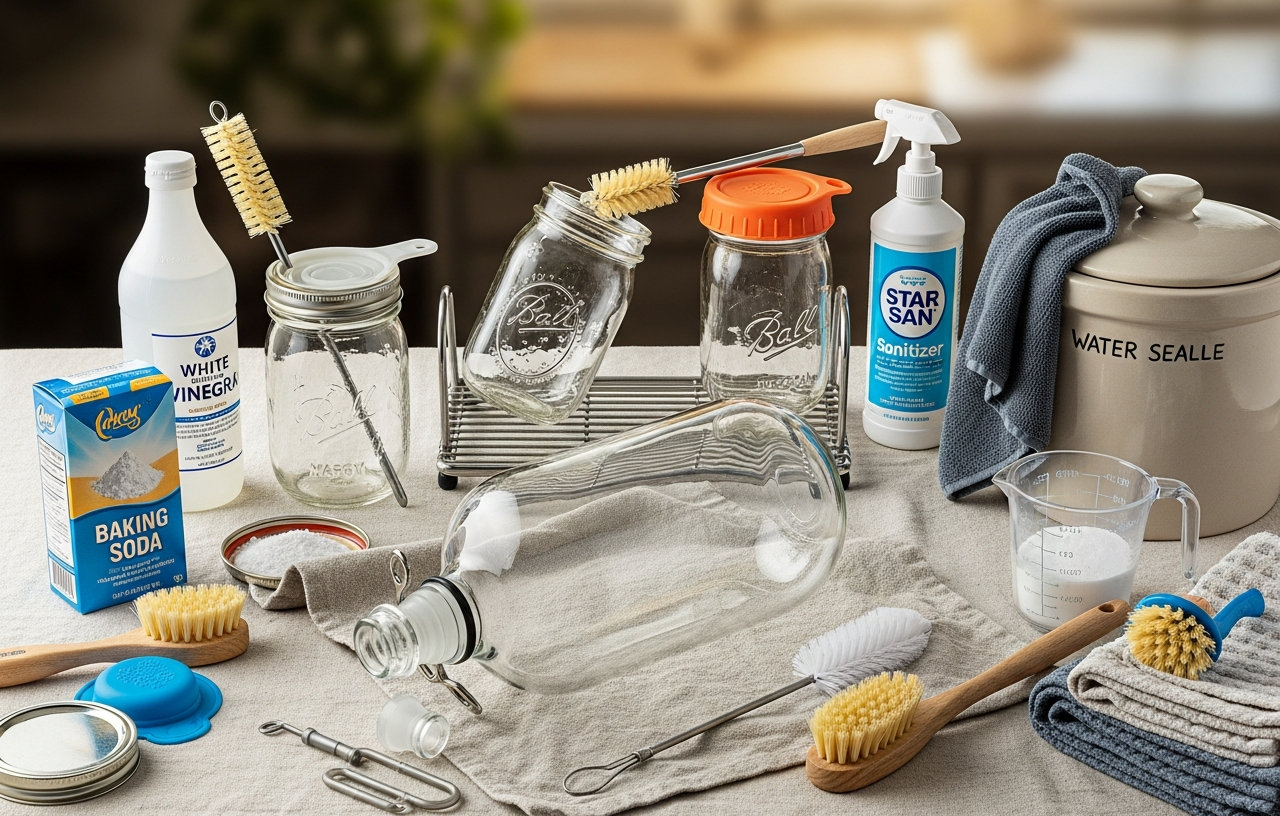
Tools and Materials You Will Need
Gathering your supplies before you begin makes the process more efficient. Most items are readily available at home or from brewing supply stores.
- Warm Water: For rinsing and soaking.
- Cleaning Solution: Oxygen-based cleaner (PBW, OxiClean Free) or specialized brewing cleaner.
- Sanitizer: No-rinse sanitizer (Star San, Saniclean) or bleach solution.
- Bottle Brush/Carboy Brush: Long-handled brushes designed for reaching vessel bottoms and corners.
- Sponge or Soft Cloth: For exterior cleaning.
- Rubber Gloves: To protect your hands from cleaning chemicals.
- Funnel: To aid in pouring cleaning solutions into narrow necks.
- Spray Bottle: For applying no-rinse sanitizer.
- Drying Rack or Clean Towels: For air drying.
For those working with tea-based ferments like kombucha, specialized cleaners can be particularly effective against stubborn tea stains and oils. Products like Stera Sheen Sani-Tea come in convenient packets and are formulated to remove tea residues and sanitize simultaneously, keeping your vessels pristine for continuous brewing. Based on manufacturer data, it works well on various tea and coffee dispensing equipment, and it will not harm components.
step by step Cleaning Process
Perform these steps as soon as possible after emptying your fermentation vessel. Dried krausen or pellicles are much harder to remove than fresh ones.
Step 1: Initial Rinse (5-10 minutes)
Immediately after transferring your beer, wine, or kombucha, rinse the vessel thoroughly with warm water. This removes the majority of the loose yeast, krausen, or SCOBY pellicle. If you use a glass carboy, be careful with temperature changes. Avoid pouring very hot water into a cold carboy, as this can cause thermal shock and crack the glass. Gradually increase the water temperature. This initial rinse saves significant scrubbing time later.
Step 2: Apply Cleaning Solution and Soak (30 minutes to 24 hours)
Fill the vessel with warm water and your chosen cleaning solution. For most oxygen-based cleaners, follow the manufacturer's instructions for dilution. For example, a common dilution for PBW is 1-2 tablespoons per gallon of water. Use a funnel to pour the solution into vessels with narrow necks. Allow the solution to soak. For light residue, 30 minutes may be enough. For heavy, dried-on krausen or stubborn tea stains, a soak of several hours, or even overnight, might be necessary.
Step 3: Scrub Thoroughly (5-15 minutes)
After soaking, use a long-handled carboy brush or bottle brush to scrub the interior surfaces of the vessel. Pay close attention to the shoulders, neck, and bottom, where residue often accumulates. For plastic fermenters, use a soft cloth or sponge to avoid scratching the plastic, as scratches can harbor bacteria. Apply gentle pressure. For very stubborn spots, a second soak may be required.
Step 4: Rinse Until Clean (5-10 minutes)
Empty the cleaning solution and rinse the vessel thoroughly with warm water. Continue rinsing until all soap suds and cleaning solution residue are gone. Hold the vessel up to a light source to inspect for any remaining film or debris. The vessel should look visibly clean and free of any odors from the cleaner.
step by step Sanitizing Process
Sanitizing occurs just before you use the vessel for a new batch. Never sanitize a vessel and then store it for an extended period without re-sanitizing it before use.
Step 1: Choose Your Sanitizer
The most common sanitizers for home brewing are no-rinse acid-based sanitizers like Star San or Saniclean. Bleach can also be used, but it requires thorough rinsing to avoid off-flavors and potential damage to equipment.
- Star San/Saniclean: These are phosphoric acid-based sanitizers. They are effective at low concentrations, create a 'no-rinse' film that is safe for brewing, and are considered food-grade. Follow dilution instructions carefully (typically 1 oz per 5 gallons of water).
- Bleach (Household Chlorine): Use a dilution of 1 tablespoon per gallon of water. Bleach is very effective but requires a thorough rinse with clean, dechlorinated water afterward to prevent off-flavors in your brew. It can also degrade some plastics over time.
For more details on sanitizer options, refer to our article How to Sanitize Brewing Equipment for Beer: Top No-Rinse Cleansers.
Step 2: Apply Sanitizer (2-5 minutes)
Fill the vessel with the diluted sanitizer solution. Make sure the solution comes into contact with all interior surfaces. For carboys, gently rock the vessel to ensure the sanitizer coats the entire inner surface. For buckets, you can swirl the solution around. Allow the sanitizer to sit for the recommended contact time, usually 2-3 minutes for acid-based sanitizers. Do not shorten this time.
Step 3: Drain and Dry (If Required)
For no-rinse sanitizers like Star San, simply drain the solution out. A small amount of foam or residue left behind is normal and will not harm your brew. For bleach solutions, rinse the vessel thoroughly with clean, dechlorinated water (boiled and cooled tap water, or filtered water) to remove all traces of chlorine. After draining, allow the vessel to air dry completely by inverting it on a drying rack. Do not towel dry, as this can reintroduce contaminants.
Drying Your Fermentation Vessels
Proper drying is a critical step before storage. Any residual moisture can promote mold growth or bacterial contamination, even after sanitizing. Invert your cleaned and sanitized vessels on a drying rack or a clean, dry surface. Allow them to air dry completely. This might take several hours, depending on humidity. Make sure the vessel is bone dry before moving to storage.
Storing Your Fermentation Vessels
Once clean, sanitized, and dry, store your vessels in a way that protects them from dust, pests, and potential damage.
-
Store in a Clean, Dry, and Dark Place: Basements, closets, or dedicated storage shelves are ideal. Avoid areas prone to extreme temperature fluctuations or direct sunlight, which can degrade plastic over time.
-
Prevent Dust and Pests: For glass carboys, placing an airlock or stopper loosely in the neck can prevent dust and insects from entering. For plastic buckets, loosely fit the lid. Do not seal lids tightly on plastic fermenters for long term storage, as this can trap moisture and promote off-odors. Many homebrewers use aluminum foil or cling wrap over the opening of glass carboys to keep dust out while allowing some air circulation.
-
Protect Glass Vessels: Glass carboys are heavy and fragile. Store them upright and make sure they are stable. Avoid stacking anything on top of them. Consider using carboy carriers or milk crates for easier handling and added protection against accidental bumps. You can learn more about glass fermentation vessels and their care.
-
Consider Storage Bags: Specialized carboy storage bags or even large, clean trash bags can offer an extra layer of protection against dust and light. Make sure the bag is clean and dry before use.
Special Considerations for Different Vessel Types
Glass Carboys
Glass offers excellent visibility and is non-porous, making it easy to clean and sanitize. However, its fragility requires careful handling. Avoid sudden temperature changes. Use specialized carboy brushes for cleaning. Never attempt to clean a glass carboy by putting your hand inside, as this poses a significant risk of cuts.
Plastic Fermenters (Buckets, Speidel Fermenters, Conical Fermenters)
Plastic is lighter and less fragile than glass. However, it can scratch more easily, and these scratches can harbor bacteria that are difficult to remove. Use soft brushes or cloths for cleaning. Avoid abrasive scrubbers. Plastic can also absorb odors over time, especially if not cleaned promptly. For a detailed comparison, see Glass Carboy vs. Plastic Fermenter: Which is Right for Your Brew?
Stainless Steel Fermenters
Stainless steel is durable, easy to clean, and does not scratch easily. It is also non-porous. Most cleaning solutions and sanitizers work well with stainless steel. Avoid using abrasive pads that could scratch the passivation layer, which protects against rust. Stainless steel is a premium choice for many serious home brewers, often found in larger systems.
Kombucha Continuous Brew Vessels
Continuous brew vessels often have spigots and may develop pellicle buildup around the faucet. Disassemble spigots regularly for thorough cleaning. Pay attention to the inside of the spigot and any gaskets, as these are common areas for residue accumulation. The Stera Sheen Sani-Tea cleaner is particularly useful for removing tea stains and residue in these vessels. For more information on these specific vessels, explore our article on Best Kombucha Continuous Brew Vessels.
Troubleshooting Common Cleaning Challenges
Stubborn Stains and Rings
If a long soak with a standard oxygen cleaner does not remove stubborn krausen rings or tea stains, try a stronger concentration of cleaner or extend the soak time to 24-48 hours. For glass vessels, a gentle scrub with a bit of baking soda paste can sometimes help, but be careful not to scratch plastic. Some commercial cleaners are designed for heavy duty stain removal.
Persistent Odors
Plastic fermenters are more prone to absorbing odors. If your plastic vessel retains a strong yeast or ferment smell, a long soak with an oxygen cleaner can help. Sunlight exposure for a few hours (after cleaning, not for long term storage) can also sometimes dissipate odors from plastic, but avoid prolonged UV exposure which degrades plastic. Make sure the vessel is completely dry before storage to prevent moldy odors.
Mold Growth
If you find mold in a fermentation vessel, especially fuzzy or black mold, it requires aggressive cleaning. A bleach solution (1 tablespoon per gallon) with a 30-minute contact time, followed by a thorough rinse, is often recommended. If the mold is extensive or has penetrated plastic, it may be safer to replace the plastic vessel. Glass can usually be salvaged with careful cleaning.
Service Calls and Professional Cleaning
For most home brewers, cleaning and sanitizing vessels is a DIY task. However, if you are operating a larger microbrewery or have commercial-scale equipment, professional cleaning services or specialized equipment (like CIP, clean-in-place systems) become more relevant. A typical service call for equipment maintenance or specialized cleaning in a commercial setting might range from $80-$150 for the call itself, plus labor at $50-$100 per hour, as of 2026. This is generally not applicable to typical home brewing setups.
Maintaining clean and properly stored fermentation vessels is not just about aesthetics. It is a fundamental step in producing high quality beer, wine, mead, or kombucha batch after batch. Diligence in cleaning and sanitizing reduces the risk of spoilage, protects your investment in ingredients, and leads to more enjoyable fermentation results. Develop a routine, stick to it, and your brews will consistently benefit.
Stera Sheen Sani-Tea - 1.5 Ounce Packets - Tea Brewer, Dispenser Cleaner and Sanitizer - Remove Tea Residues and Oils, Ensure
- Your order will contain a box of 80 x 1.5 oz. easy to use portion packets. Easy to follow instructions are.
- Cleans and sanitizes the following: tea brewers, tea and coffee dispensers, dispenser nozzles, brew.
- Sani-Tea Tea Brewer Cleaner by Purdy Products will not harm any components of your equipment and will.
- A Powerful descaler designed to clean & protect the following: urns, percolators, automatic drip, air.