
Premium Nylon CO2 Regulator Washers, Self Centering, Fits All CGA-320 Fittings (12) - Perfect Seal, Perfect Fit, Every Time!
- Premium Nylon construction. Engineered in the USA!
- Sealing ribs ensure an air-tight seal between regulator ad CO2 tank, Centering fins accurately position.
- 3/4" OD, 1/4" ID, 0.110" Thk
- Fits all CGA-320 Fittings. (Not replacement for the Taprite permanent O-Ring)
A CO2 tank that empties rapidly, often in a matter of days or weeks instead of months, signals a leak within your kegerator or draft beer setup. This unexpected expense and inconvenience frustrates any homebrewer. The most common culprits are faulty CO2 regulator connections, issues with the gas lines and connectors, or problems with the keg's seals themselves. Identifying the precise location of the leak is the first step toward a lasting repair.
The Importance of a Tight CO2 System
Your CO2 tank provides the pressure to dispense beer and carbonate it. A small leak, even one you cannot hear, allows this expensive gas to escape. This means more frequent refills and inconsistent carbonation levels in your homebrew. Understanding how to perform CO2 tank empty quickly leak detection saves money and improves your draft beer experience.
Tools for Leak Detection
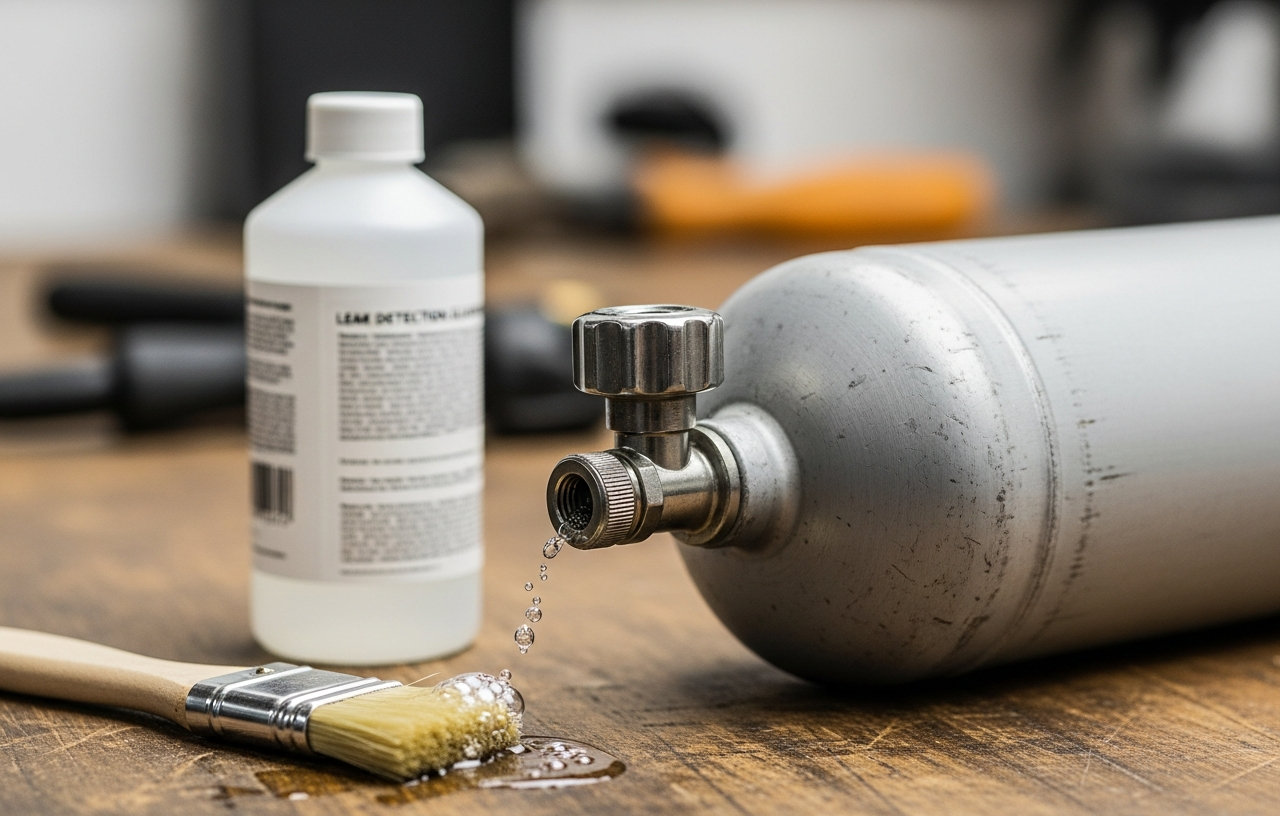
Before you begin troubleshooting, gather a few simple tools. You will need a spray bottle filled with a solution of soapy water (dish soap and water works perfectly). A bright flashlight can also help you see small bubbles. Some leaks may be audible, so listen carefully.
Cause 1: CO2 Regulator Connection Leaks
The connection between the CO2 tank valve and the regulator is a very common place for leaks. This connection relies on a washer to create a gas-tight seal.
How to Test for Regulator Leaks
- Close the Tank Valve: Turn the main valve on top of your CO2 tank clockwise until it is fully closed.
- Spray the Connection: Thoroughly spray the entire connection point where the regulator attaches to the CO2 tank. Cover the nut, the threads, and the area around the washer.
- Open the Tank Valve Slowly: Carefully open the CO2 tank valve counter-clockwise. Listen for a hiss and watch for bubbles forming at the connection.
- Observe Bubbles: If you see persistent bubbles, you have found a leak. Even tiny, slow-forming bubbles indicate a problem.
Fixing a Regulator Connection Leak
If you identify a leak at the regulator connection, the washer is almost always the problem. The existing washer might be old, cracked, compressed, or simply not aligned correctly. Replace the washer with a new one. Disconnect the regulator, remove the old washer, and insert a fresh one.
For a reliable seal, consider using Premium Nylon CO2 Regulator Washers. These self-centering washers are engineered in the USA with premium nylon construction. Their sealing ribs create an air-tight seal between the regulator and CO2 tank, while centering fins make sure they are positioned accurately. They fit all CGA-320 fittings, measuring 3/4" OD, 1/4" ID, and 0.110" Thk.
Make sure the regulator nut is tightened firmly with a wrench, but do not overtighten it. Overtightening can damage the washer or the threads. After replacing the washer, repeat the soapy water test to confirm the leak is gone. If your regulator is old or damaged, you may need a new one. If the regulator itself is faulty and needs replacement, new regulators generally cost between $50 and $150, depending on features and brand. Professional service calls for kegerator diagnostics and repair typically range from $80-$150, plus parts.
Cause 2: Gas Line and Connector Leaks
Leaks can occur anywhere along the gas line that carries CO2 from the regulator to your keg. This includes the barbed fittings, clamps, gas disconnects, and any quick-connect fittings.
How to Test Gas Lines and Connectors
- Pressurize the System: Ensure your CO2 tank is open and the regulator is set to your desired serving pressure (e.g., 10-12 PSI).
- Spray All Connections: Starting from the regulator's output, spray soapy water generously over every connection point. This includes:
- The barbed fitting where the gas line attaches to the regulator.
- Any inline gas manifolds or splitters.
- All hose clamps along the gas line.
- The gas quick disconnect (ball lock or pin lock) where it attaches to the gas line.
- The gas post on the keg itself.
- Look for Bubbles: Carefully observe each sprayed area for bubbles. Pay close attention to the base of the barbed fittings and around the clamps.
Fixing Gas Line and Connector Leaks
If you find bubbles at a barbed fitting, first check the hose clamp. Tighten it if it feels loose. If tightening does not stop the leak, you might need to replace the clamp with a new one, or the gas line itself may be compromised and need to be cut and reattached or fully replaced. Make sure the hose is pushed completely onto the barb before securing the clamp.
Leaks at the gas disconnect often mean the internal O-ring is worn or damaged. Disassemble the disconnect and replace any O-rings inside. These are inexpensive and widely available. Sometimes, the disconnect itself can be faulty and require replacement. Leaks at the keg's gas post usually mean the post's O-ring is faulty or the post is not tightened correctly. Remove the post, replace the O-ring, and reseal it.
Always make sure you use gas-rated hose clamps and not just standard hose clamps. These ensure a tighter, more secure connection designed for pressurized gas. For insights into building a complete draft system, refer to resources on best kegerator conversion kits.
Repair Costs for Gas Line Leaks
Replacing hose clamps, O-rings, or small sections of gas line typically costs under $20. A new gas quick disconnect usually runs between $10 and $25. If you need to replace a longer section of gas line, expect to pay around $1-$3 per foot. These are generally DIY fixes, so labor costs are avoided unless you hire a professional.
Cause 3: Keg Seal Leaks
The keg itself has several points where CO2 can escape. These include the main lid O-ring, the gas and liquid post O-rings, and the pressure relief valve (PRV).
How to Test for Keg Leaks
- Pressurize the Keg: Connect your gas line to the keg's gas post and apply pressure (e.g., 10-12 PSI).
- Submerge the Keg (If Possible): If your keg is empty or only partially full, and you have a large enough tub, submerge the entire keg in water. Look for any stream of bubbles coming from the lid, posts, or PRV. This is the most effective method for finding small leaks.
- Spray the Keg Seals: If submersion is not practical, spray soapy water generously over all potential leak points:
- Around the entire circumference of the keg lid.
- At the base of both the gas and liquid posts.
- Around the pressure relief valve (PRV) on the lid.
- Observe for Bubbles: Watch for any bubble formation. Leaks around the lid O-ring can be very subtle.
Fixing Keg Leaks
If the leak is at the lid, the main lid O-ring is likely the culprit. Remove the lid, inspect the O-ring for cracks, flat spots, or dirt, and clean or replace it. Lubricating the O-ring with food-grade lubricant can also help create a better seal. Make sure the lid is properly seated and the bail handle is fully engaged to compress the O-ring.
Leaks at the gas or liquid posts mean the O-rings on the posts themselves are faulty or the posts are not tightened enough. Unscrew the posts, replace the O-rings, and reseal them. Remember to only tighten posts hand-tight, then a quarter turn with a wrench. Overtightening can damage the O-rings or the posts.
A leaking PRV often means it is dirty or has a damaged spring. Try pressing and releasing the PRV button a few times to clear any debris. If the leak persists, the PRV may need replacement. It is a simple screw-in part. Regularly checking and replacing O-rings is part of good keg maintenance. Explore options for best 5-gallon ball lock kegs for homebrewers, many of which come with fresh O-rings or have readily available replacement parts.
Repair Costs for Keg Leaks
Keg O-ring replacement kits are very affordable, typically $5-$15 for a set that includes lid and post O-rings. A new pressure relief valve costs around $5-$10. These are easy DIY repairs. If a keg itself is damaged (e.g., a dented rim preventing a good lid seal), replacing the keg would be a more significant cost, ranging from $70-$120 for a new 5-gallon ball lock keg.
General Leak Detection Tips and Best Practices
Always Check After Disassembly
Anytime you disconnect or reconnect a part of your CO2 system, especially the regulator or keg posts, perform a quick soapy water test. This proactive approach prevents wasted CO2.
The Submersion Method
For small parts like gas disconnects or even entire gas lines, submerging them in a bucket of water while pressurized is the most sensitive leak detection method. Any tiny bubble stream will be visible.
Audible Leaks
Sometimes, a large leak will produce a distinct hissing sound. Listen carefully around your system, especially when it is quiet. While not as precise as the soapy water method, it can quickly point you to a general area.
Regular Maintenance
Proactive maintenance extends the life of your equipment and prevents leaks. Inspect all O-rings and washers regularly for wear and tear. Replace them at the first sign of cracking, flattening, or hardening. Proper sanitization of brewing equipment includes checking seals and ensuring everything is clean before use.
Preventative Measures for CO2 Leaks
Prevention is always better than cure. Here are some steps to minimize the chances of a CO2 leak:
- Use high quality Components: Invest in reliable regulators, gas lines, and connectors. Cheap components are often a false economy.
- Proper Installation: Always use appropriate tools and techniques when assembling your system. Do not overtighten fittings, but make sure they are snug.
- Lubricate O-Rings: Apply a thin layer of food-grade lubricant to all O-rings (lid, posts, disconnects) before reassembly. This helps create a better seal and prolongs O-ring life.
- Store CO2 Tanks Correctly: Keep CO2 tanks upright and secure to prevent accidental damage to the valve.
- Regular Inspection: Make a habit of visually inspecting your system for any obvious signs of wear or damage before each use.
Finding the source of a CO2 leak can feel like a chore, but it is a necessary skill for any homebrewer with a kegerator. By systematically checking each connection point with soapy water, you can quickly diagnose and fix the problem, ensuring your CO2 tank lasts as long as it should and your beer stays perfectly carbonated.
Premium Nylon CO2 Regulator Washers, Self Centering, Fits All CGA-320 Fittings (12) - Perfect Seal, Perfect Fit, Every Time!
- Premium Nylon construction. Engineered in the USA!
- Sealing ribs ensure an air-tight seal between regulator ad CO2 tank, Centering fins accurately position.
- 3/4" OD, 1/4" ID, 0.110" Thk
- Fits all CGA-320 Fittings. (Not replacement for the Taprite permanent O-Ring)